
Adding a 4th Axis to a CNC Router: Uses, Setup, and Key Considerations
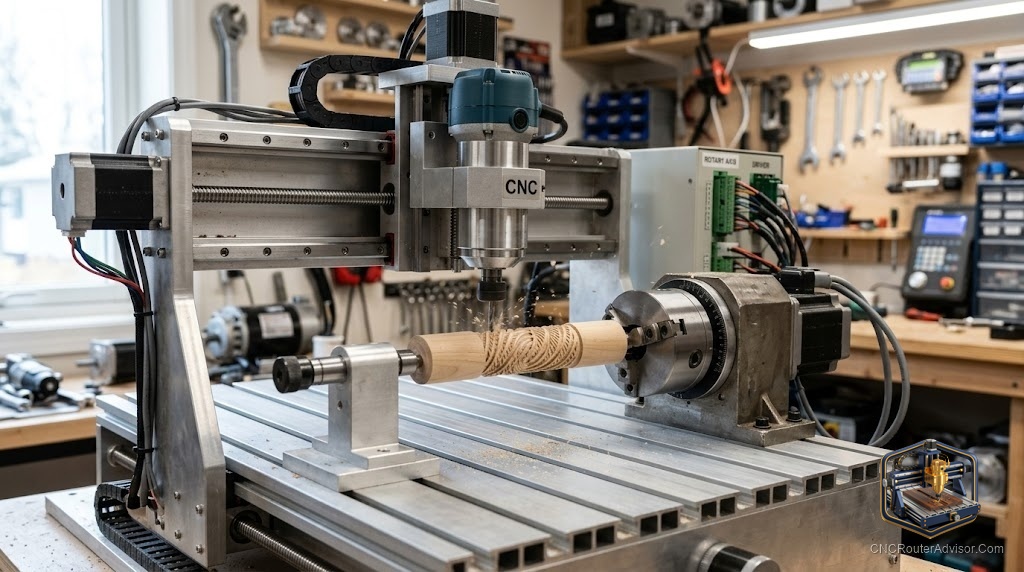
You have a table leg to make. Turned blank is done, sitting on the bench, round and clean. Now you want four flutes running down it, evenly spaced, cut to a depth that a hand router can’t reliably repeat four times in a row. You clamp it to the machine bed, set up the toolpath, run it, flip it ninety degrees, run it again. The seam at each transition is visible. The flute depths are off by half a millimeter between passes.
That problem has one clean solution: a 4th axis. It spins the blank while the spindle cuts, so all four flutes happen in a single uninterrupted setup. Every flute is the same depth. There are no seams.
Adding a 4th axis to a CNC router means installing a rotary chuck assembly (chuck, stepper motor, and usually a tailstock) along one of the linear axes, then wiring a fourth stepper driver and configuring the controller to treat the rotation as a fourth axis. In GRBL this is the A axis. In Mach3 it is the fourth axis in the configuration table.
Here is the short answer on whether to add one: add a 4th axis if your work includes cylindrical or columnar pieces that you currently cut in multiple setups with visible seams. Do not add one if your work is flat. A 4th axis adds complexity, uses bed space, and costs more.
What the 4th axis actually is
A standard 3-axis CNC router moves in three straight-line directions: X (left to right), Y (front to back), Z (up and down). The 4th axis is a rotary A axis, a motor-driven chuck that spins the workpiece around the X centerline while X and Z cut.
This single addition changes what you can carve in one setup:
- Flutes, twists, and spirals around a cylinder
- Full-round shapes like chess pieces or turned column profiles
- Indexing (lock at 90 degrees, cut a face, rotate again) for hex or octagonal stock
- Continuous wrap-around engraving on a round object
What it does not add: spindle tilt. A rotary A axis still points the cutter straight down. The part rotates to present different faces. A true 5-axis machine also tilts the cutter approach angle, which is a different and far more expensive capability.
What you need to add a 4th axis
A spare driver channel on the controller. GRBL has four axis outputs: X, Y, Z, and A. Most hobby GRBL boards (gShield, CNCShield, xPro) expose the A axis connector. Confirm your board has an unused A-axis driver slot before ordering any hardware.
A rotary assembly. A chuck (usually 3-jaw or 4-jaw self-centering), a stepper motor (NEMA 23 for anything mid-size), and a tailstock to support long pieces at the far end.
A stepper driver. If your board has an integrated A-axis driver, you may not need a separate one. If it uses plug-in drivers, you need one more matching driver module.
CAM software that generates rotary toolpaths. Not all CAM tools do this. Vectric VCarve Pro, Aspire, and Fusion 360 support rotary axis machining. Carbide Create does not. Check before you spend.
Configuring steps per degree
Once the hardware is wired, the controller needs to know how many motor steps equal one degree of rotation. The formula:
Steps per degree = (Motor steps per revolution x microstepping setting) / (Total gear ratio x 360)
Example for a NEMA 23 (200 steps/revolution) with 16x microstepping and a 6:1 belt reduction: 200 x 16 / (6 x 360) = 1.481 steps per degree
Enter this value as the A-axis steps/mm equivalent in GRBL ($103). Jog the axis 360 degrees and verify the chuck returns exactly to its start position. If it overshoots or undershoots, adjust the value until it is exact.
Set soft limits for the A axis if your controller supports it. Rotary axes usually have no hard limit (they can spin indefinitely), so soft limits prevent the G-code from commanding unintended multiple rotations.
Homing and work coordinates for rotary work
A rotary axis usually does not have a homing switch because it can spin continuously in either direction. Instead, you manually zero the A axis at the start of each job by rotating the chuck to the desired start angle and zeroing the axis in your sender.
Work coordinates (G54 and above) save your X, Y, Z, and A zeros independently from machine home. For rotary work, the X zero is typically the center of the chuck face, and A zero is your start rotation position.
Two verified rotary 4th axis options
CNCTOPBAOS CNC Rotary Axis with K11-100mm Chuck
A NEMA 23-driven rotary assembly with a 100mm three-jaw self-centering chuck, 6:1 belt reduction, 65mm center height, and an MT2 tailstock. Designed for mid-size CNC routers in the 6040 to 6090 class.
Honest flaws: no manual or brand support. You wire it yourself and configure steps from scratch. It is heavy at approximately 17 lbs, which costs bed space and Z clearance when mounted. Buy it if you are comfortable configuring the controller axis manually.
Genmitsu 4th Axis Rotary Module
A NEMA 17 planetary-geared (10:1) rotary module with a 4-jaw chuck and a tailstock. Designed specifically for Genmitsu 4040 and 3030 machines with a factory-compatible mounting pattern. Maximum clamping diameter around 50mm. Good documentation and a compatible cable for Genmitsu GRBL boards.
Honest flaws: the 50mm diameter limit rules out table legs, newel posts, and most woodturning stock. NEMA 17 is underpowered for hardwood at the spindle speeds a 4040 can run. This module suits small-diameter cylindrical work (pens, bangles, chess pieces) on smaller machines.
Which rotary suits which machine
| Machine class | Recommended rotary | Why |
|---|---|---|
| 3018, 3020, small desktop | Genmitsu 4th Axis Module | Size and driver power match |
| 4040-PRO | Genmitsu 4th Axis Module (for small stock) or CNCTOPBAOS K11 | Genmitsu for pens/bangles; K11 if you need larger diameter |
| 6040, 6090 class | CNCTOPBAOS K11-100 | Chuck size and NEMA 23 motor match the machine scale |
CAM workflow for rotary cuts
In Vectric VCarve Pro:
- Create a new file and select the rotary axis option.
- Set the diameter and length of the cylindrical blank.
- Draw your design on the unwrapped cylinder surface.
- Generate a rotary toolpath using the appropriate strategy (fluting, 3D carving, or relief).
- Post-process using the GRBL 4th-axis post-processor.
- Run in UGS or Candle.
In Fusion 360:
- Set up the stock as a cylinder.
- Use the Manufacturing workspace, select a rotary strategy.
- Configure the rotary axis as A.
- Post-process with GRBL post-processor.
Practical projects a 4th axis enables
- Table legs and balusters with flutes, twists, or reeding
- Newel posts with carved relief
- Chess pieces with precise, repeatable profiles
- Rolling pins with embossed patterns
- Pen blanks with engraved details
- Cylindrical signs with text wrapped around the circumference
- Hex-faceted handles indexed at precise angles
Verdict
Adding a 4th axis to a CNC router is a practical upgrade for anyone who regularly works with cylindrical stock. The hardware is a real commitment in bed space, Z clearance, and setup time. The payoff is eliminating the seam-and-flip problem on round work entirely.
Four concrete checks before you order:
- Confirm your GRBL board has an available A-axis driver output. No spare driver channel, no 4th axis.
- Match the chuck size to your stock diameter. A 50mm chuck is not a table leg chuck.
- Confirm your CAM software generates rotary toolpaths. Not all of them do.
- Calculate steps per degree before first use and verify by jogging 360 degrees back to start.
FAQ
What is the A axis on a CNC router? The A axis is the fourth axis, a rotary axis that spins the workpiece around the X centerline. GRBL supports X, Y, Z, and A natively.
Can I add a 4th axis to any CNC router? Only if the controller has a spare driver channel for the A axis. Most GRBL-based hobby machines have this. Industrial and proprietary controllers vary.
What GRBL setting controls the rotary axis?
$103 sets the steps per degree for the A axis. Calculate using the formula: (motor steps x microstepping) / (gear ratio x 360).
What CAM software supports rotary 4th axis? Vectric VCarve Pro, Vectric Aspire, and Fusion 360. Carbide Create does not support rotary toolpaths.
Can I keep the rotary axis mounted and still do flat work? Yes, but the chuck assembly takes up bed space and Z clearance. Many owners remove it between jobs and reinstall when needed.
What is the difference between 4th axis indexing and continuous 4th axis? Indexing rotates the part to a fixed angle, locks it, and cuts a face, then rotates to the next angle. Continuous (simultaneous) 4th axis rotates while X and Z cut simultaneously, producing spirals and wrap-around shapes.
References
- GRBL documentation, axis configuration: https://github.com/gnea/grbl/wiki
- Vectric, Rotary Axis Machining tutorials: https://www.vectric.com/support/tutorials
- workshopcalc.com, CNC Router Buyer Guides: https://workshopcalc.com/guides/best-cnc-routers