
65mm CNC Router Mount Explained: Uses, Setup, and Key Considerations
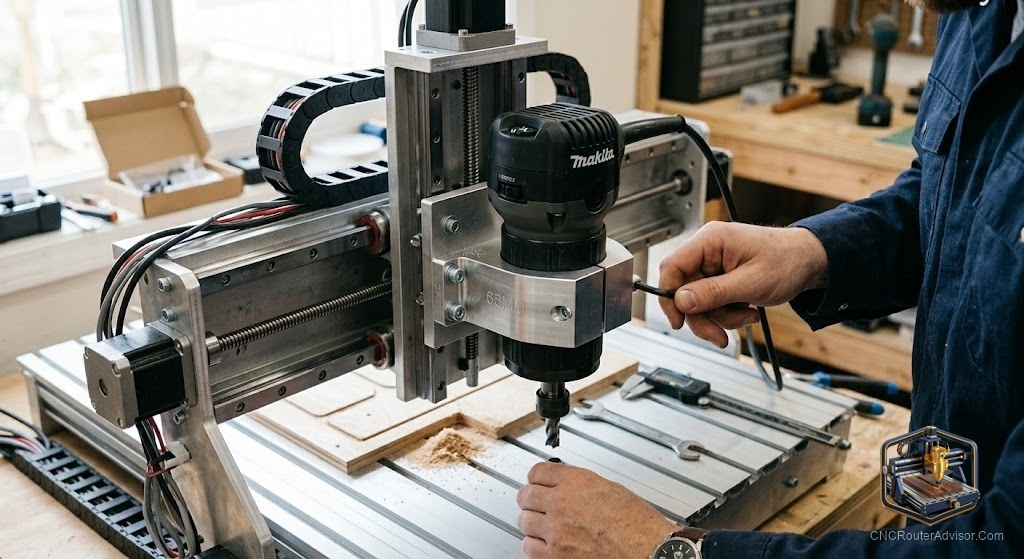
Your Z axis carriage came with a spindle clamp sized for the motor that shipped in the box. Then you tried to bolt in a Makita palm router, held it up to the bracket, and the body just rattled around inside. That gap is the whole reason a 65mm CNC router mount exists. It is the small aluminum part that decides whether your cuts come out clean or come out chattering.
A 65mm CNC router mount is a clamp or bracket that grips a 65mm-diameter trim router or spindle and bolts it to the Z axis of a hobby CNC machine. The number refers to the body diameter of the tool, not the collet or the bit. Most compact routers used on desktop CNCs share this 65mm body size, which is why the mount became a common upgrade path.
Here is the short version if you are in a hurry: a 65mm mount lets you swap the weak stock spindle on a small CNC for a stronger trim router like the Makita RT0701C or a proper 65mm spindle motor. Pick a solid aluminum mount that matches your machine’s Z carriage bolt pattern, confirm your router body is actually 65mm, and plan to tram the mount after you install it. Do those three things and you get more power and steadier cuts.
What a 65mm router mount actually does
The mount has one job that sounds simple and turns out to matter a lot: hold the cutting tool rigid and square to the bed.
Think of it as the bridge between two worlds. On one side is your machine’s motion system, the rails and lead screws that move the tool around. On the other side is the router body spinning a bit at high speed. Any flex, any wobble, any slop in that bridge shows up in your finished part as fuzzy edges, uneven depth, or a rippled surface.
A good mount does three things at once:
- Grips the full 65mm body so the router cannot shift under cutting load.
- Ties into the Z carriage with a bolt pattern that matches your machine.
- Keeps the tool axis vertical so the bit cuts flat instead of at a slight angle.
That last point is why cheap plastic clamps frustrate people. Plastic gives a little every time the bit bites into hardwood, and that tiny movement multiplies across a large surfacing pass.
Why 65mm became the standard size
The 65mm figure comes straight from the compact router market. Several popular trim routers share a body that measures right around 65mm across, so accessory makers standardized on that number.
The most common tools in this size class are the Makita RT0701C, the DeWalt DWP611, and various Kobalt and off-brand palm routers built on the same general body. Because so many machines ship without a strong spindle, buying a 65mm mount plus one of these routers turned into a well worn upgrade for owners of 3018, 4040, and similar desktop CNCs.
One honest caution here. Not every “65mm” router is exactly 65mm. Some DeWalt bodies and some clones run slightly larger, closer to 69mm, which is why you will see mounts sold as “65 to 69mm” with a listed range. Measure your router body with calipers before you buy, or check that the mount specifically lists your model.
Trim router in a mount, or a dedicated spindle?
This is the real fork in the road, and it deserves a straight answer.
| Factor | Trim router (Makita, DeWalt) in a mount | 65mm brushless spindle |
|---|---|---|
| Power and torque | Strong, handles hardwood well | Adequate, varies by model |
| Runout | Higher, depends on the tool | Usually lower with proper bearings |
| Noise | Louder, universal motor whine | Quieter |
| Low speed control | Limited at the bottom end | Better across the range |
| Bit ecosystem | Very wide, standard collets | Narrower, often ER11 |
| Repair and parts | Easy, brushes and parts everywhere | Depends on brand support |
If you already own a Makita or DeWalt, buy the mount and run what you have. If you are starting fresh and care about surface finish on detailed work, a dedicated spindle is worth a look.
The routers people mount in 65mm brackets
Makita RT0701C. A 1-1/4 HP compact router with a variable speed dial running 10,000 to 30,000 RPM, soft start, and a 1/4 inch collet. It is the default choice for a reason: the body is a true 65mm fit for most mounts, and parts are everywhere. The flaw worth naming is that its speed does not go low enough for some plastics and aluminum.
You can find the Makita RT0701C on Amazon.
DeWalt DWP611. A 1-1/4 HP compact router with variable speed and dual LED lights. On a CNC those lights do nothing, so you pay for a feature you will not use. The other honest flaw is body diameter: some DWP611 units measure closer to 69mm, so pair it with a mount that lists the 65 to 69mm range.
Here is the DeWalt DWP611 on Amazon.
Genmitsu 710W 65mm spindle router. Built specifically as a CNC spindle in a 65mm body, with six variable speeds, an ER11 collet, and included carbon brushes. It drops straight into a 65mm mount with no adapter. The tradeoff is less raw power than a full sized trim router and a brushed motor that will need brush replacement over time.
Take a look at the Genmitsu 710W 65mm compact router on Amazon.
Choosing the right mount for your machine
Match the bolt pattern first. A mount made for a Genmitsu 4040 will not line up with a random Chinese 3018 carriage without drilling. Buy the mount that lists your machine model.
Pick aluminum over plastic. Machined aluminum resists the flex that ruins finish.
Confirm the diameter and the depth. A 65mm inner diameter is standard, but check the mount thickness too. A thicker clamp grips more of the router body and holds alignment better.
Two verified options cover most desktop Genmitsu machines:
- The Genmitsu 65mm aluminum spindle mount fits the 3018-PRO, 4040 series, 3020-PRO MAX V2, and PROVer machines. Outside dimension is 88 by 91 by 36mm with a 65mm bore.
- The Genmitsu 65mm mount for the PROVerXL 4030 is sized for that larger machine at 110 by 99 by 35mm with a 65mm bore.
If you own a different brand of machine, measure your carriage bolt spacing and buy a mount that matches.
Setup and installation, step by step
- Power down and unplug the machine and the router.
- Remove the stock carriage. On most Genmitsu machines this is four screws.
- Bolt the new mount to the Z carriage. Snug the screws but leave them slightly loose so you can square things up.
- Slide the router in until the base of the router body sits where you want it, then tighten the clamp evenly.
- Square the mount to the carriage, then tighten the carriage screws fully.
- Tram the spindle before your first real cut.
Tramming, and why it matters
Tramming means adjusting the mount so the spindle is perpendicular to the bed on both the X and Y axes. If the bit is even slightly tilted, a surfacing pass leaves a ripple where one side of the bit cuts deeper than the other. To tram, mount a flat bar or a tramming gauge in the collet, sweep it across the bed, and shim or adjust the mount until the reading is even in all directions.
Runout, rigidity, and vibration
Three related factors decide how good your cuts look, and the mount touches all of them.
Runout is how much the bit wobbles off its true center as it spins. A loose or flexy mount adds to whatever runout the tool already has.
Rigidity is the mount’s resistance to flexing under load. This is the single biggest argument for aluminum over plastic.
Vibration is the symptom you feel and hear. A poorly gripped router amplifies it. Tormach’s guidance on runout applies here: keep bit stickout short to maximize rigidity and cut down on wobble.
Dust, plunge, and the small stuff
Dust shoes often mount to or around the router body, so your new mount has to leave room for one. Check that the clamp does not block where it attaches.
Plunge and Z travel. A trim router in a fixed mount does not plunge on its own; your machine’s Z axis does all the vertical movement. Make sure the router sits high enough in the clamp that you keep full Z travel.
Conclusion: what to actually buy
A 65mm CNC router mount is a small part that punches above its size. It turns a weak desktop CNC into something that can push a real trim router or a proper spindle.
Honest verdict and takeaways:
- If you already own a Makita RT0701C or DeWalt DWP611, buy a machined aluminum 65mm mount that matches your Z carriage and run the router you have. Confirm the body diameter first.
- If you want the lowest runout on detailed work, a dedicated 65mm spindle like the Genmitsu 710W drops in without an adapter.
- Choose aluminum, never plastic. Rigidity at the tool is where finish quality is won or lost.
- Tram the mount before your first cut. Ten minutes of squaring the spindle saves you from rippled surfaces on every project after.
FAQ
What does 65mm refer to on a CNC router mount? It refers to the body diameter of the router or spindle the mount grips. It has nothing to do with the collet size or bit diameter.
Will a Makita RT0701C fit a 65mm mount? Yes. The Makita RT0701C body is a true 65mm fit for standard 65mm mounts and is the most common router people install.
Does the DeWalt DWP611 fit a 65mm mount? Usually, but measure first. Some DWP611 bodies run slightly larger than 65mm, so pair it with a mount rated for the 65 to 69mm range.
Should I use a trim router or a dedicated spindle? Use a trim router for maximum power, easy parts, and the widest bit selection. Use a dedicated 65mm spindle for lower runout, quieter operation, and better control at low speeds.
Do I need to tram the spindle after installing a new mount? Yes, and do not skip it. Tramming squares the spindle to the bed so surfacing passes come out flat instead of rippled.
Why does mount material matter so much? Because rigidity at the tool controls finish quality. Aluminum resists the flex that plastic clamps allow under cutting load.
Can a better mount reduce runout? It can reduce the flex and slop that add to runout, but it cannot fix runout built into the tool’s own bearings.
Will a 65mm mount work with a dust shoe? Often yes, but check clearance. Many dust shoes attach around the router body, so confirm the clamp leaves room for your shoe to mount.
References
- Makita U.S.A, Makita RT0701C product information: https://makitatools.com/
- AccTek CNC, “Understanding the Perils of Spindle Runout in CNC Routers”: https://acctekcnc.com/understanding-the-perils-of-spindle-runout-in-cnc-routers/
- SainSmart, “Mastering CNC Router Tramming”: https://www.sainsmart.com/blogs/news/mastering-cnc-router-tramming-a-comprehensive-guide-1
- Tormach, “Measure and Fix Spindle Runout, The Tool Life Killer”: https://tormach.com/articles/measure-fix-spindle-runout-tool-life-killer